Non-Vital Tooth Whitening
A discoloured tooth can have a significant impact of a patient’s self-confidence.
We can often manage this effectively by non-vital tooth whitening. This is much more conservative than masking the discolouration using a veneer or crown.
Aetiology
There are many causes of tooth discolouration. We can broadly separate these into extrinsic and intrinsic factors.
Extrinsic factors
- Diet (wine, tea, coffee, green tea, iron supplements, betel nut)
- Tobacco
- Mouthwash (chlorhexidine)
- Plaque and calculus (chromogenic bacteria).
We can remove extrinsic staining by polishing the tooth surface.
Intrinsic factors
We can split intrinsic factors further into systemic and local factors.
Systemic factors include:
- Medications (tetracycline)
- Metabolic (fluorosis or dystrophic calcifications)
- Genetic (ameologenesis/dentinogenesis imperfecta).
Local factors include:
- Ageing
- Pulp canal obliteration
- Pulp pathology
- Iatrogenic.
The most common cause of non-vital discolouration are pulp pathology and iatrogenic factors.
Pulp canal obliteration (PCO)
PCO occurs to varying degrees in 4-24% of teeth following trauma. It is characterised by a yellow discolouration of the crown and loss of the canal space radiographically (McCabe and Dummer, 2012).
We can treat the yellow discolouration by external tooth whitening. But it may take longer to achieve a satisfactory result. A veneer might be necessary if a satisfactory result cannot be achieved with external whitening alone (Figure 1).

Figure 1a

Figure 1b
Figure 1: Pulp canal obliteration (PCO). The patient had trauma to UL1 15 years ago and developed a yellow discolouration over time. She was keen to improve the appearance of the tooth. The UL1 was asymptomatic and did not respond to sensibility testing.
Radiographically, UL1 had a normal PDL width and an intact lamina dura could be seen around the tooth. A diagnosis of pulp canal obliteration was reached for UL1. There was no endodontic infection and the patient was advised to have external tooth whitening; this will take longer and a veneer might be necessary if a satisfactory result can’t be achieved with external whitening alone. Figure 1a: Preoperative photograph. Figure 1b: Preoperative radiograph.
Pulp necrosis occurs in approximately 7-27% of teeth with PCO. This will often be followed by symptoms or a periapical radiolucency.
It is important not to initiate root canal treatment until this stage because many teeth remain vital, despite being unresponsive to sensibility tests.
Endodontic treatment is very challenging in teeth with PCO. It is not always possible to locate the canal and it can be destructive trying. The risk of endodontic complications (perforation or instrument separation) is also higher.
Pulp pathology
Damage to the pulp can cause haemorrhagic products to flow into the surrounding dentinal tubules (Figure 2).
Haemolysis of red blood cells results in the release of iron. Bacteria produce hydrogen sulphates which convert iron to a dark compound called ferric sulphide. This is responsible for a grey discolouration.
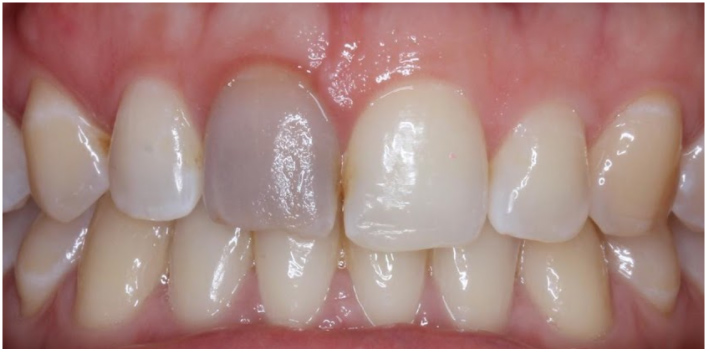
Figure 2: The patient has trauma to UR1. The tooth developed pulp necrosis and a grey discolouration
Pulp remnants left in the pulp horns can also gradually disintegrate. This leads to continued discolouration following endodontic treatment. An insufficient access cavity is a common cause of this problem (Figure 3).
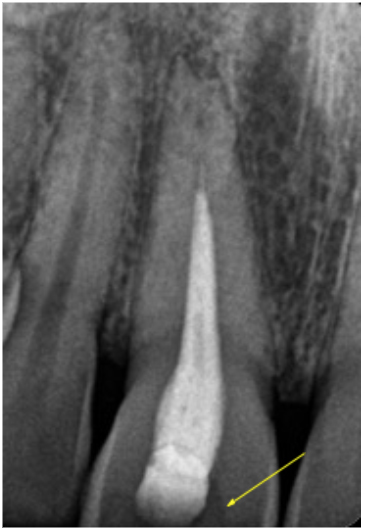
Figure 3: The endodontic access does not include the pulp horns
(indicated by the yellow arrows). Pulp remnants left in these
areas can disintegrate over time leading to discolouration
Iatrogenic
Restorative materials contribute to tooth discolouration.
Coronal fillings
Dark restorative materials such as amalgam, metal posts and pins can give a dark appearance to teeth. Simply removing these materials can make a significant difference to the colour.

Figure 4a: Coronal restorations contributing to the discolouration of anterior teeth – pins

Figure 4b: Amalgam filling in the access cavity

Figure 4c: Metal post
The migration of metallic ions can also stain the surrounding dentine. This can often be seen after metal restorations are removed. This type of staining can be very difficult to remove using tooth whitening and can reappear over time.
Microleakage around composite restorations can cause discolouration of the margins and surrounding tooth tissue.
Endodontic materials
Root filling materials and sealer left in the coronal aspect of the tooth can cause visible tooth discolouration. If these materials are left in contact with dentine they can also penetrate the dentinal tubules over time.
Following endodontic treatment, the root filling should be cut to below the level of the gingival margin to prevent this problem occurring (Figure 5). The pulp chamber can be cleaned using ultrasonics and alcohol to remove fine traces of sealer.

Figure 5a: Periapical radiograph showing GP and sealer in the coronal aspect of the tooth.
Endodontic materials should be cut off below the level of the gingival margin to prevent discolouration

Figure 5b
Bleaching agents and UK regulations
The active ingredient in bleaching agents is hydrogen peroxide (H2O2). H2O2 can be applied directly or via a chemical reaction from the breakdown products of carbamide peroxide or sodium perborate.
Currently in the UK, dentists are allowed to use up to 6% hydrogen peroxide or 16% carbamide peroxide.
The patient is required to have a dental examination prior to embarking on tooth whitening.
Inside-outside whitening
This technique involves bleaching the tooth from the ‘inside’ and ‘outside’.
The access cavity is left open and a custom bleaching tray is made to hold to gel against the internal and external aspect of the tooth simultaneously. Therefore, the bleaching gel can be regularly changed.
Preoperative assessment (Figure 6)
- Clinical assessment
- The tooth should be asymptomatic prior to considering bleaching
- Radiographic assessment
- The tooth should have a good quality root canal filling with no evidence of periapical pathology. If there are any problems then root canal retreatment is required (even if the patient is asymptomatic)
- Clinical photographs
- Clinical records to show the initial shade. Including a shade tab can be helpful.

Figure 6a: Preoperative assessment UR1 – periapical radiograph; the root canal filling is not ideal and will require revision prior to bleaching

Figure 6b: Preoperative photograph

Figure 6c: Preoperative photograph taken with shade tab for reference
Preparation of the pulp space (Figure 7)
- Root canal retreatment (if required)
- Rubber dam isolation
- Removal of the access cavity restoration. Refine the shape of the access cavity to ensure the pulp horns are clean
- Removal of the coronal gutta percha to 3-4mm below the level of the cemento-enamel junction (CEJ) or gingivo-epithelial attachment. A heated plugger, gates-glidden or thin gooseneck burs are useful for cutting back the GP. A periodontal probe or Machtou plugger can be used to check the depth is sufficient
- Clean the cavity to remove any remnants of debris and sealer. An ultrasonic scaler is useful for this
- Place a 2-3mm barrier (subseal) over the GP. This will prevent bacteria or hydrogen peroxide from penetrating the root filling. Various materials have been suggested for this including IRM, GIC and composite. I prefer IRM because it is easy to handle. It also has a white colour and can be easily removed from the dentine walls. GIC or composite (especially the bonding agent) can sometimes remain on the canal wall and prevent the bleaching agent from penetrating the dentinal tubules
- Re-clean the dentine walls using an ultrasonic scaler
The best time to carry it out non-vital tooth whitening is immediately following endodontic treatment. This is because there is no permanent restorative material in the access cavity that needs removing.

Figure 7a: Preparation of the pulp space – root canal retreatment of UR1.
It is essential the root canal filling is of good quality prior to carrying out non-vital tooth whitening

Figure 7b: The GP is cut back 3-4mm below the gingival margin

Figure 7c: The access cavity is refined to remove pulpal tissue or endodontic materials from the pulp horns

Figure 7d: A Machtou plugger or periodontal probe is used to ensure the GP has been cut back to the correct level

Figure 7e: A 2-3mm IRM barrier or subseal is placed over the GP

Figure 7f: The access cavity is cleaned using ultrasonics or a fine long-neck bur

Figure 7g: The access cavity is left open ready for the inside-outside whitening
Bleaching protocol (Figure 8)
- An alginate upper impression is used to construct an upper bleaching tray. A reservoir can be requested on the tooth to be bleached.
- Remove extrinsic stain
- I would highly recommend carrying out an intraoral demonstration for the patient at this visit
- The patient is instructed to ensure the tooth is dry
- A small bend is placed in the whitening syringe tip and the gel is injected into the palatal access cavity
- A small drop of the gel is also placed on the buccal surface of the bleaching tray
- The whitening tray is inserted
- The patient is instructed to put finger pressure on the buccal and palatal aspect tooth to spread the gel evenly over the surface
- Advise the patient to replace the bleaching gel every two to three hours and at night. I would recommend over-whitening the tooth because the shade usually relapses slightly (Figure 9)
- Postoperative verbal and written instructions:
- The patient is given a plastic mirror and microbrushes, and shown how to keep the access cavity clean. The patient should clean the cavity after eating and before replenishing the bleaching gel because food or debris will reduce the efficacy of the gel
- Avoid smoking and foods that can cause staining for at least two hours after bleaching.

Figure 8a: Bleaching protocol – an alginate impression is taken to construct a bleaching tray

Figure 8b: A small bend is placed on the tip of the whitening gel to make it easier to insert into the access cavity

Figure 8c: Gentle finger pressure is used over the tooth to spread the gel evenly over the tooth surface

Figure 8d: Microbrushes and a plastic mouth mirror are given to the patient to keep the access cavity clean

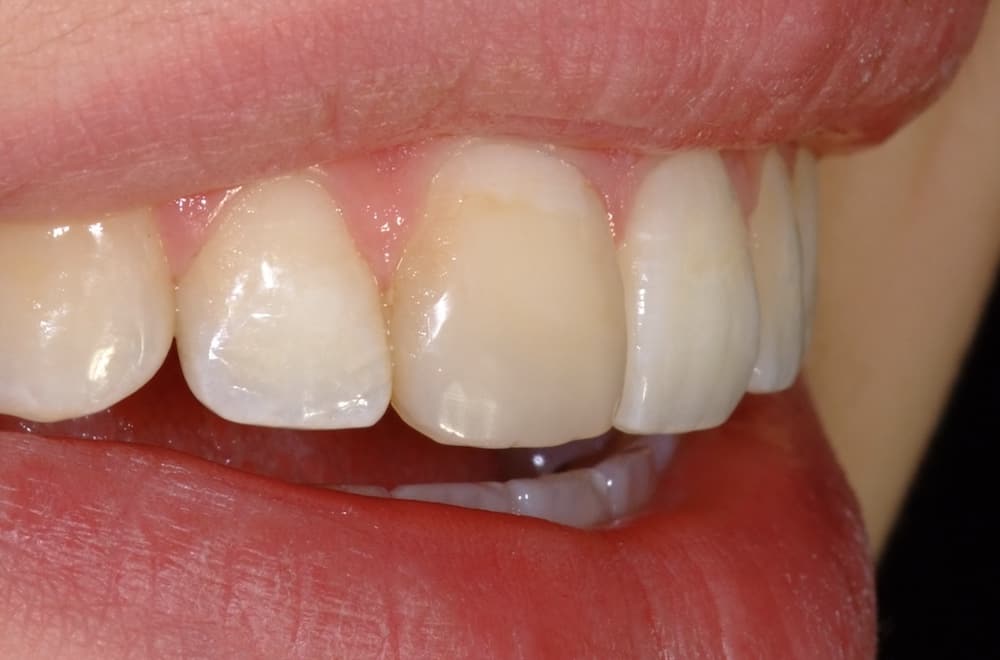
Figure 9a: The UR1 has a grey discolouration. Inside-outside bleaching was carried out – preoperative

Figure 9b: Immediately postoperative. We aim for a slightly lighter shade because we would expect some degree of relapse
Reassessment
- We can reassess the patient at two to three days. The whitening process usually occurs rapidly because the whitening gel is changed so frequently.
Definitive restoration
- Rubber dam
- Clean the access cavity using ultrasonics and hypochlorite
- Composite restoration. I would recommend placing a light shade of composite (B1) (Figure 10)
- Remind the patient that the shade can relapse over time and the bleaching may need topping up externally periodically.

Figure 10a: Definitive restoration placed after inside-outside whitening – preoperative

Figure 10b: Postoperative. A light shade of composite is used in the endodontic access because the colour of these teeth can relapse slightly over time
Troubleshooting
Another popular non-vital whitening technique is called the walking-bleach technique. This involves sealing the bleaching agent inside the access cavity.
Whitening gel has a half-life of two hours. Therefore, the repeated applications involved in the inside-outside technique has a big advantage over the walking-bleach technique.
In addition, oxygen produced from the whitening reaction internally can sometimes dislodge the temporary filling.

Figure 11a

Figure 11b
Benefits and risks of tooth whitening
It is important to manage patients’ expectations and obtain informed consent prior to treatment.
Benefits
- Tooth whitening is the most conservative way to improve the discolouration.
Risks
- Treatment cannot be carried out if the patient is pregnant or breastfeeding
- Temporary sensitivity of adjacent teeth
- Temporary chemical irritation of the oral mucosa
- Existing restorations will not whiten and will require replacement post-bleaching
- Additional treatment (such as a veneer or crown) may be required if the discolouration does not fully resolve
- Relapse and need to top-up the bleaching externally in the future
- The procedure requires good patient compliance
- External cervical resorption (ECR). The incidence is very low and the cases reporting this complication used a thermo-catalytic technique (heat or light used to activate the hydrogen peroxide).
Failure to whiten: troubleshooting
Non-vital tooth whitening has an excellent success rate. Studies have shown success results in 95% of cases when the cause of tooth discolouration was from a pulpal origin.
However, there are a few reasons why the clinician may struggle to achieve a successful result:
- Patient compliance: if a patient is unable to load the palatal access cavity or keep it clean. This can be prevented by assessing the patient’s manual dexterity, carrying out in-mouth demo on the first visit and reinforcing the importance of good hygiene
- Incomplete removal of the access cavity restoration: GIC or composite remnants block the dentinal tubules and prevent bleach penetration
- Incomplete removal of the gutta percha: if the root filling is not cut back below the CEJ or gingiva-epithelial attachment the cervical aspect of the tooth will not whiten
- Extension of the bleaching tray: if the tray does not extend or fit well around the cervical margin this can prevent adequate whitening in this area
- Teeth discoloured by restorative materials are more difficult to whiten. In particular, discolouration from metal ions may not always be successful.
Conclusion
Non-vital tooth whitening is an important adjunct to endodontic treatment. It is a simple, effective and conservative treatment option to improve the appearance of a discoloured tooth.
It should be considered the treatment of choice before more destructive options such as a veneer or crown.
The inside-outside technique has the advantage or repeated gel applications over the walking bleach technique.
It is important to carry out a detailed pre-operative assessment and revision of the existing root canal filling if required.
References
McCabe PS and Dummer PM (2012) Pulp canal obliteration: an endodontic diagnosis and treatment challenge. Int Endod J 45(2): 177-97
Plotino G, Buono L, Grande NM, Pameijer CH and Somma F (2008) Nonvital tooth bleaching: a review of the literature and clinical procedures. J Endod 34(4): 394-407
Poyser NJ, Kelleher MG and Briggs PF (2004) Managing discoloured non-vital teeth: the inside/outside bleaching technique. Dent Update 31(4): 204-14\
Author: Kreena Patel
This article originally appeared at: https://www.dentistry.co.uk/
